Project
Alpha Romeo Giulietta Spider, Part 1
In May 1999 I decided it was time I had another classic
car, having had a break from them for a couple of years to pursue my motorcycling
interest. I fancied something not too expensive and useable for the odd rally
and weekend away. Id always liked the look of MGAs so I went over to Bob Wests
place near Huddersfield, where he had a selection of cars in various states
of dilapidation and restoration including his own very special Le Mans fast
back coupe.
In amongst the
MGs, which were mostly American Imports, was a car I didnt recognise. Bob
explained that this was a 1959ish Giulietta Spider which he had found on his
travels in California and liked the look of, so he had brought it over in a
container with a pile of MG stuff.
It was in a sorry state having not run since 1986 and
stood outside since. However it was basically sound despite rusty door bottoms,
a rather battered boot lid and a general state of dilapidation.
When I got home I searched through my old magazines
and books to find out what I could about the model and found that very little
had been written about them as they are fairly rare in this country. This is
hardly surprising, as in 1959 when they were first imported here they cost
£2116, or roughly £300 more than a MkIX Jaguar.
However I did
manage to find the odd contemporary road test and they were all fullsome in
their praise of the little car, with phrases like a car has no right being so desirable.
Any way I was hooked, and the following weekend I
hooked up the trailer and handed over more money than I should have done for my
next project.
First produced in 1955, the Spider shared the 1300cc
twin overhead cam engine and running gear with the Sprint coupe announced a
year earlier. This features a well located back axle with trailing arms and an
A frame, and coil springs over telescopic dampers. Front suspension is double wishbones with coil springs and
telescopic dampers, and an anti roll bar, and the drum brakes have huge finned
drums. The front ones are a work of art, having deep diagonally machined
grooves in their circumference to aid cooling. Styling was by Farina and I
think the car is much prettier than the later Duetto
Meanwhile back to the plot, with the trailer back on
my drive complete with Alfa. (see photo).
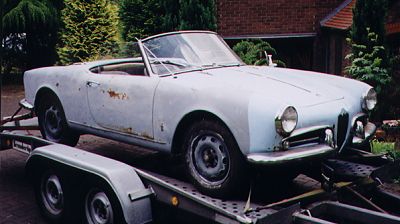
The Alfa arrives, ripe for restoration!
As the hand brake didnt work and I couldnt get any
of the gears, I jammed a large block of wood behind one of the back wheels,
and started to tilt the bed of the trailer. Unfortunately the tyre was soft
and as soon as the trailer was tilted the car rolled over the chock and set
off at a rate of knots down the drive. Despite my frantic efforts I couldnt
stop it and it finished up impaled on the corner of the garage. I think I said
Oh bother what an unfortunate setback or words to that effect, while my wife
Sheila, sympathetic as ever, fell about laughing.
Within two weeks I had it stripped to a bare body
shell, by which time it was apparent that it was not quite as sound as it had
appeared. Are they ever!
The main areas needing attention were the boot floor
which had corroded under where the battery sits and the main floors, which
although not perforated were a bit thin as a result of standing in the open ,
albeit with an ill fitting hard top. The door bottoms were pretty rusty and the
bonnet had a few bubbles along the back edge. Otherwise, apart from numerous
dents, the body was good. Needless to say replacement panels are no longer
available so the next decision was what to do next.
The question was answered when a week or two later I
went to the Tatton Park Classic Car Show and bumped into a company called
Sprabake from Whitchurch. The man seamed enthusiastic and capable of doing a
good job, so the following weekend I delivered it to their place, with
instructions to strip the shell back to bare metal, repair as necessary and
re-paint.
Having dropped the car off I continued on my way down
to Stanford Hall in Leicestershire for National Alfa Day, where I spent a couple
of hundred quid on bits for the car. Dont you just love coming home with a
boot full of toys to store away ready for the day when you can screw them on
to your pride and joy.
While the body was away I got stuck in to restoring the
mechanical bits, starting by totally dismantling every component down to the
last detail. This can be a bit intimidating as you finish up with a lot of boxes
of bits, but it is the only way to do a proper organised restoration that doesnt
take for ever. (My next door neighbour doesnt agree with me on this, but he
has been restoring a Triumph Roadster for ten years now and it looks pretty
much the same now as it did when he started.)
I kept every nut bolt screw and washer, no matter what
condition they were in. Next came the worst bit but its best to get it all
over with at once, and that involved cleaning the accumulated muck off all the
parts. I have a proper parts washer, which is basically just like a kitchen
sink with a pump to re-circulate the Jizer cleaning fluid. These are not that
expensive, and certainly make life a lot easier. Even parts which are to be
sandblasted are better cleaned off this way first as the dirt can set solid and
sometimes gets missed. The components were then sorted according to what needed
doing to them. I had a box for all the bits that were to be chrome plated, one
for the parts to be zinc plated, one for the parts to be powder coated, one for
parts such as the exhaust manifold that needed sandblasting, and one for all
the bits that just needed overhauling.
Some parts for chroming needed dents removing,
especially the back bumper, so these needed to be put right first. You need a
bit of skill for this and if you dont have it, leave it to someone who does,
as you can easily ruin irreplaceable parts.
All this took weeks, and its dirty boring work, but it
is essential to stick at it at this stage as it pays dividends later. I took
all the suspension components and various brackets, air cleaner canister etc.
to Radcliffe Powder Coatings (0161 723 4713) for sand blasting and powder
coating in gloss black. They also do matt and satin finishes which are slightly
tougher but I wanted a nice shine on my components. I also took the cam cover,
steering column shroud, and dashboard edge nosing for finishing in crackle
black as original. You can buy this finish in spray cans, but the quality and
hardness of the finish just isnt as good
While all the parts were away, there was still lots to
do, bushes and ball joints for the suspension and steering to order, the brakes
to recondition, and the engine and gearbox to tackle. I split the gearbox from
the engine and took them over to Westune at Horwich for their expert advice.
Peter West has been fettling Alfas for donkeys years so I couldnt have wished
for better help.
The engine was in a very poor state having suffered
from frost damage, with the block split along the side, and the head split
along the top. The pistons were completely seized in the bores and the main
bearings had pulled out of shape through it being over revved.
The easiest thing to do at this stage would have been
to scrap the whole lot, and put a later 1600 engine and five speed box in, but
these early cars are quite rare, and the later engine is slightly taller and
needs a different bonnet. A five speed box would have been nice but again this
would have needed some mods to the body and rear gearbox mounting so I decided
to keep it all original.
We managed to find a block and head in Germany, for
£500 but found that the head had been over skimmed and was a good 3mm thinner
than mine. There was therefore nothing for it but to get the original head
welded up, and being aluminium this was quite a skilled operation. It welded up
OK but when I had it skimmed, some corrosion was apparent around the combustion
chambers so this had to be ground out and welded then re- skimmed, which
exposed some more porosity so the whole process had to be repeated.
In The meantime Peter was trying to separate the
pistons from the cylinders. These are a wet liner engine so neither the pistons
nor liners were to be re-used but we needed the con rods. Eventually they came
apart after soaking for a few weeks and the application of enormous pressure.
All the necessary new parts were ordered and Peter spent ages lapping in the
new liners into the block to ensure a good seal around the bottom. This is a
highly critical operation as there is a very thin rubber O rig to form the
seal around the bottom, and the top of the liner must finish up just .002
above the top face of the block to ensure sufficient nip when the head is
tightened down. The piston / con rod assemblies were then balanced to within
1/64th of an ounce. Before the whole thing was assembled I spent
many hours fettling the block and head castings to make the castings look like
new, and painted the sump the correct dove grey colour and the oil filter the
correct shade of orange. The inside of the sump was difficult to clean as it
was heavily baffled, but I found a mousse type alloy wheel cleaner excellent
for dissolving all the baked on oxidised oil. Finally it was spotlessly clean,
and re-assembly could begin.
We finally finished it on Christmas Eve 1999, threw a
sheet over it went home for a well earned rest.
Next time, more disasters, the body shell gets rescued
and it all starts to go back together.
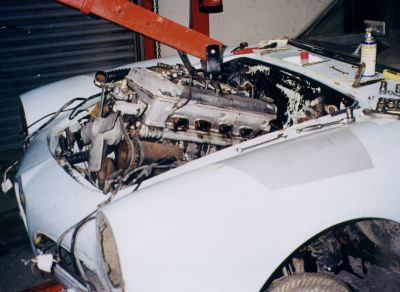
Out comes the engine